The other day I began a random journey of trying to get Podman to work on a virtual machine with a WordPress image. Why? Because I apparently like to pull my hair. Now, some of you are probably wondering why I wanted to do this. The biggest reason being I don’t want to be using Docker. I like the fact Podman is open source.
With Docker there are some limitations when it comes to using it. The biggest one being the user limit. There are some places that really do have 250 people using it and that makes it a little difficult. But that’s besides the point really. The reason I really wanted to use Podman was because I wanted to try something new. To learn something new.
I broke my brain a little.
The really cool part being that I was able to get WordPress up and running using Podman. There were a few things I did encounter of course but I was at least able to get a local installation running.

As you can see it does use port 8080. That is one thing that can be configured which was great when I was first trying to get things up and running.
One of the first things I did was open up Boxes because that’s what was already on my Fedora installation. I looked up what was needed and found out I could run things with Podman Compose which is great. Another alternative which is open source.
I looked up an example to see what else I needed and found that I just needed to get a yml file with all the things I would need.
That file was actually from one of the examples provided by Docker Compose.
version: "3.8"
services:
  db:
    # We use a mariadb image which supports both amd64 & arm64 architecture
    image: mariadb:latest
    command: '--default-authentication-plugin=mysql_native_password'
    volumes:
      - db_data:/var/lib/mysql
    restart: always
    environment:
      - MYSQL_ROOT_PASSWORD=rootpassyword
      - MYSQL_DATABASE=wordpress
      - MYSQL_USER=wordpress
      - MYSQL_PASSWORD=wordpress
    expose:
      - 3306
      - 33060
  wordpress:
    image: wordpress:latest
    volumes:
      - ${PWD}/wp_data:/var/www/html:z
    ports:
      - 8080:80
    restart: always
    environment:
      - WORDPRESS_DB_HOST=db
      - WORDPRESS_DB_USER=wordpress
      - WORDPRESS_DB_PASSWORD=rootpassyword
      - WORDPRESS_DB_NAME=wordpress
  wpcli:
    depends_on:
      - db
      - wordpress
    image: wordpress:cli
    volumes:
      - ${PWD}/wp_data:/var/www/html
    restart: always
volumes:
  wp_data:
Yeah, that’s a little odd to see. At least it was for me. One thing that was a little odd was that extra :z at the end of the volumes declaration for the wordpress service. You might also notice there is a ${PWD} on there as well. That will create the volume on the current working directory. I’m sure there is a better way of doing that and I would love to know that. Maybe one day I’ll find out. For now I just needed things to work for me.
And I’ll say this again, I just wanted things to work so the methods I used may not be the best practice. After having created the docker-compose.yaml file from the above, I then ran a command to get things up and running.
podman-compose up -d
You can see the command is fairly similar to how Docker Compose is also run when it comes to getting things built. The next somewhat hurdle I did encounter was not being able to create folders and files on the volume. This was a weird one for me. I haven’t used Podman prior to this so I was a little puzzled and a little impatient. The great part being I did manage to resolve it.
podman unshare chown 0:0 -R wp_data/
Yeah, that command is a little odd. There is a reason it works – at least I’m sure there is. Again, this was to get things running and working for me on my local machine.
I guess the last few things that really were nice about getting all of this up and going was being able to run some actual commands inside of the containers. A few good examples would be running WP CLI commands, MySQL commands, and being able to run some basic shell commands.The one I really wanted most was being able to connect to the database via the command line.
podman exec -it {project}_db_1 mysql -uwordpress -pwordpress wordpress
Obviously that’s an example command where you would change the {project}_db_1 to correspond to the database service naming you’ve chosen.
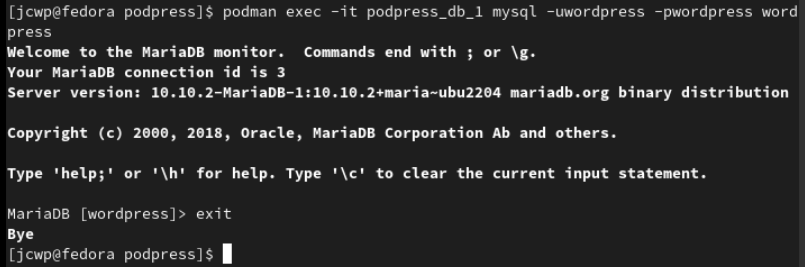
You can see the container is using the latest MariaDB version. And yes, I was using simple user, password, and table name for all of this. Keep in mind this was all to simply test things out to see how it all works.
And of course we have to get an idea of how to run WP CLI. Or at least how to get information from WP CLI using Podman.
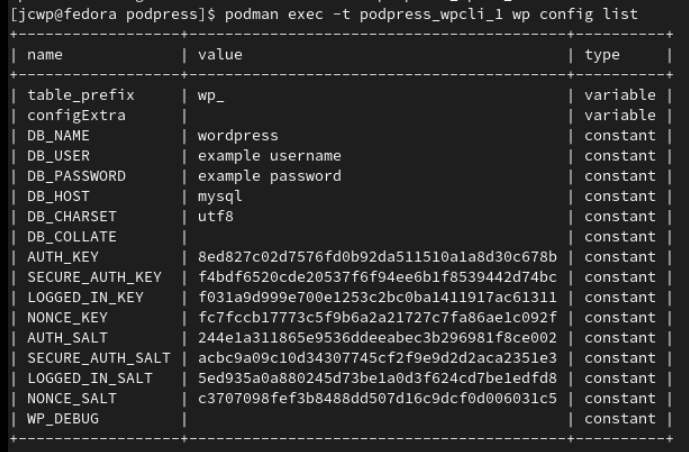
Not quite the same result as connecting to the database but it does work. For now, this all works on a virtual machine but it could very well work on a regular machine. I’ll be doing that at one point too. If anything does change I’ll, of course, be posting about it here.